
The boat was purchased in the early summer of 2015 and is undergoing a full restoration and refit in St. Augustine, Florida (close to a Home Depot and a Westmarine branch as well as the famous Sailor's Exchange store, where I spend hours scouring through piles of old boat parts for classic bits-and-pieces which are no longer manufactured.)
Pearson Yachts was a venerable brand name among American boatbuilders, and their older models from the late 1960's and early-70's have a good reputation as stoutly-built and sea-worthy vessels with thick, solid fiberglass hulls. They went out of business in the 1990s, and the last Pearson 35 was built around 1980, with about 500 sold in total.
Designed by Bill Shaw, the Pearson 35 is a 35-foot (10.7 meter) mast-head sloop with a water-length of 25 feet. A full keel and displacement of 13000 lbs (6 metric tons) means the Pearson 35 was designed conservatively by today's standards, making for a safe and easy-to-handle boat. Based on the CCA design rules of the day, the Pearson 35 has long overhangs and a narrow beam of 10 feet (3 meters) and is today classified as a moderate to heavy-displacement cruiser (sail area to displacement ratio: 15.9)
Any sailboat design is a compromise between various competing considerations. In selecting a boat, my primary concern was safety, followed by versatility and ease of handling. I selected the Pearson 35 model because it met my requirements, and they are generally less expensive than similar-sized sailboats of the era due to the centerboard, which many potential buyers wrongly assume presents a significant headache.
On my boat, the first project was re-attaching the centerboard cable that had parted. This was really not such a big deal. All that was necessary was a pipe-wrench and a few feet of stainless steel wire cable with an eyesplice. Of course you have to pay a bit more attention to the compartment where the centerboard lives when scraping the hull clean of marine growth, and that's really about it. Oh, should the cable part again, don't yank it out all the way!

Naturally the centerboard cable on my boat had parted and was pulled out of its tube all the way, requiring me to reconnect the centerboard cable (and then later disconnect and reconnect them again when I made integral water tanks in the keel.)
Some reviewers claim that the large, nine foot-long cockpit of the Pearson 35 is a liability offshore since she can ship a lot of water if pooped, but increasing the size and number of scuppers easily resolves that concern. I don't really plan on battling too many major storms anyway and would rather avoid them, so getting pooped is not a major concern. (Years of accumulated data by the Coast Guards show that the biggest threat to boaters is alcohol consumption by fellow boaters, by far.)
The initial survey showed no real big surprises for this particular boat, which came with no extras such as electronics or after-market gear that would only add to the headaches in a refit. The boat was judged to be in "average" condition by the surveyor, with the usual problems expected of a boat of this age. However, the engine, wiring and other fittings were in good shape, as was the rigging. The mainsail is in good shape too, with many years left in it. I will add lazy jacks, and a Harken roller-furling foresail, and may replace the shrouds and turnbuckles just to be sure though they are in good shape.
The most significant problems were the small wet spots in the deck around some fittings and the mast base. The deck-stepped mast is supported below by an aluminum compression post, which is itself supported by a block of wood sheathed in fiberglass. On my boat (and many others) this block of wood rotted away long ago and had turned into a wet sponge (the shower pan and anchor locker drain hoses ended right up against the compression post block!) causing the mast to press down into the deck. In turn, that led to water intrusion around the mast base into the balsa core of the deck. I had to dig out the wet balsa core there, and replaced it with a thick G10 fiberglass sheet.
 |
| Compression post base - where are the bolts? Never found them. |
 |
| A wet sponge was holding up the mast compression post! |
The wooden block below the compression post was also replaced with a 3-inch thick block of G10, which was probably overkill. There were also a few wet spots around a couple of stanchion bases and cleats. Since I planned on re-bedding all the deck fittings anyway, using more substantial backing plates than the original fender washers and wooden (dry-rotted) backing plates fixing these wet spots was inevitable.
My goal in restoring the boat was first to "Keep It Simple" and to try to keep as much as the original character of the vessel as possible, especially the 1960's-style interior. I also wanted to make her easier to sail single-handed so I replaced the steering wheel with a tiller (ridding myself of the complications of the steering quadrant, chains, pulleys etc., while also significantly opening up the cockpit space) and upgraded her old winches to larger-sized self-tailers. I also plan to remove the traveler entirely in favor of end-boom sheeting, add telescoping emergency boarding ladders on each side, and move the water tank from the bow to under the settees.
New electronics will be added, including full instruments, radar, AIS transponder, autopilot, wind monitor, VHF with RAM, and two Raymarine multifunction displays for the cabin and cockpit helm. I was considering lithium-iron batteries but have decided to hold off on that for now, until the kinks are worked out of the technology (after witnessing one boat on fire as a result of poorly-designed lithium batteries with corroded connections and too-tight packing of the cells resulting in too much heat accumulation, I had second thoughts about the batteries.) I'll exchange the wet-cell battery with larger capacity AGMs and add a starting battery, as well as solar panels on a hard bimini that I will build too.
Of course, I have all the latest safety gear, including a Viking 4-person valise liferaft, two EPIRBs, and four sets of offshore PDFs (each with their own PLBs and lights) and a LifeSling system. I also invested in a MOB alarm, particularly for any kids on board. I decided to forego an SSB radio in favor of a satellite tracker and telephone. I also added teak handrails inside the boat, at shoulder level below the portholes. The automatic bilge-pump will be replaced by two larger capacity models, with a high-water alarm. Naturally I will add fire, carbon monoxide and propane alarms too. I also have a spare anchor, a Fortress stern-hung anchor, a sea anchor, and a drogue.
All the portholes were removed and replaced with a total of eight opening portholess, which significantly improve ventilation below. The original small, oval-shaped portholes were not of much practical use anyway, and the large fixed ports were starting to leak.
I also added salt-water faucets in the galley and head, and an electric washdown pump in the bow. (I am considering placing a fresh-water washdown pump in the cockpit. It would be convenient to shower, rinse off diving gear, etc. but it would also increase fresh water consumption, so...)
Other upgrades to the galley include a new Dometic stove with a dedicated propane tank locker, and a new stainless steel sink, as well as a wall-mounted manual coffee grinder (no power consumption, and single-handed operation -- very important on a heeling sailboat.) I have not yet investigated the icebox and don't know how well that works, though it seems reasonably functional.
I'll install new fans and new LED lighting, as well as a new tricolor masthead light and spreader lights. A 400-watt stereo system with 4 speakers, plus a DC-powered LCD monitor, all connected to a laptop computer loaded with navigation apps which is safely tucked way in a waterproof compartment and operated using an illuminated wireless keyboard, complete the electronics upgrades.
I am also redesigning the anchor locker and adding a hatch on deck instead of using the v-berth hatch, adding new teak hand rails inside and outside the cabin, as well as folding mast steps. I don't want a windvane or wind generator but I will carry a large-capacity car booster battery for back-up power. No pressurized water, water heater, air conditioning etc. either.
I am now in the process of repainting the boat entirely. This is probably the hardest project since it is not only very time-consuming but also very detailed and hard work. It took months to remove all the old fittings, the nasty old nonskid that was itself mixed with sand and therefore impervious to my sander, and the damaged gelcoat underneath that. Filling, fairing, sanding and priming the deck under the hot Florida sun, while tormented by vicious no-see-ums and other biting insects, and while covered in fiberglass dust, was no fun at all.
I have to also paint the ceiling of the cabin interior. The old paint comes off in strips, Removing the old paint is not an easy job since sanding or grinding will remove the texture pattern on the cabin liner, so I can't just take a grinder to it. I'm considering using paint stripper, heat guns, wire brushes and 3M Roloc bristle disks for that job.
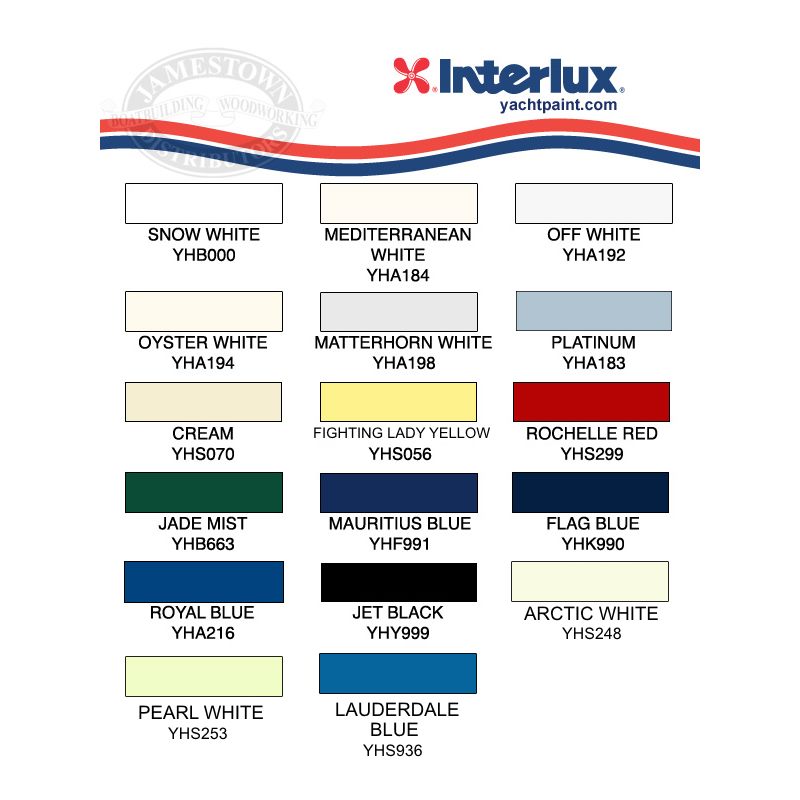
Currently the boat has a navy blue hull. Dark colors are too hot for the tropics, and the paint is chipping off anyway, so I plan to go with Interlux Perfection Fighting Lady Yellow. The deck will be white. I'll be using KiwiGrip nonskid paint too. Since painting with two-part paint is really an art, and getting a good finish using the roller-tipping method is MUCH harder than painting a house with latex paint, I had to practice a lot on a dinghy. It took several layers of paint before I "got the hang of it" with a reasonable finish. I still don't have it down pat -- you can see the lines between patches if you look very closely. Too closely.
Anyway, please visit regularly as I plan to update this blog more often now.
I purchased a Pearson 35 last summer. She needs work. I'm interested in following your work.
ReplyDeleteWe purchased a 1976 Pearson 35 last year. She's in very good condition and surveyed so. We did change the pendant cable last year before we splashed her in. We're did repower this year. However most other work is cosmetic and personalization. Good luck with the project
DeleteSV Whimsy, fantastic that you are sharing this info! I just bought a '71 Pearson 35. My biggest concerns right now are repairing the mast support - which I see you have had to do too - and removing/refabbing the forward/bow water tank so i can repair a hole in my starboard bow! I have been trying to remove the tank by cutting around the edges of the "well" with a multi-tool. i've cut through two layers of fiberglass that seemed to attach the top perimeter to the hull and vberth frame, and the two wood/fg tabs on the aft end. but it still doesn't budge. have you gotten to that project yet? or know more about how that tank is secured and how to remove it without just carving it up?
ReplyDeleteWe just purchased a 1970 Pearson 35 in Febuary and are so excited to begin restoring her! So happy you have shared your journey with the rest of us, so we can learn and get an idea of what we are getting into with each new project
ReplyDeleteI was recently given a 1979 Pearson 35. It seems to be in good condition except for needing a lot of cleaning. One question, does it have a holding tank?
ReplyDeleteI my hull number 104, the holding tank is the port side tank. It used to be one of the three water tanks. With the new regulations mandating a holding tank we utilized the port water tank. I recommend installing an electronic gauge to provide a means of knowing when the tank is filling up. Don't want any surprises during a long sail. https://www.internationalmarineservice.com/Albin-Pump-Marine-Tank-Level-Indicator-Kit-12-24-p/alb-03-66-012.htm
DeleteWas wanting to know if you replaced any of the cabin sole? I have hull 36. It looks like to me that the whole sole structure was built outside of the hull and then dropped In and glassed in around the edges only, I was wanting to know if I can tab in and glass the new sole supports to the hull and then lay new flooring and glass it back to the edges
ReplyDeleteThanks in advance
Ed Zurcher